

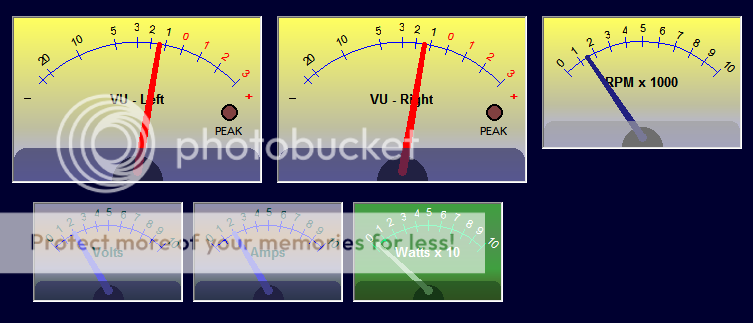
Use procedure MeterGadget(gadNum.i, x.i, y.i, size.i, caption.s = "", style.i = 0) to create your meter gadget.
You control the needle positoin using the procedure SetMeterState(GadNum.i, position.f)
The meter gadget has a built in smoothing function that you can activate with SetMeterSmoothing(GadNum.i, value.i)
Edit: 3/29/2013
Added optional flags to draw the needle using anti-aliasing lines.
Using one of these options will result in better looking needles but CPU load will increase.
On my system CPU load increased 3% to 5% with anti-aliasing style needles on two meters.
Edit: 3/28/2013
Made the peak LED an option set with a flag and is now available for both linear and VU meter types.
Added alpha blending to the bottom of the meter for more realistic appearance.
Minor improvement in needle appearance when deflection is far left or far right of center.
BP
Code: Select all
; Name:    MeterGadget.pbi
; Version: 1.2
; Author:  BasicallyPure
; Date:    3.29.2013
; OS:      Windows, Linux, Mac
; PB ver.: 5.11
; License: Free
;
; Syntax: result = MeterGadget(#gadget, x, y, size, [caption], [flags])
;   #Gadget  | number to identify the gadget. #PB_Any can be used to auto-generate.
;   x, y     | location of the meter gadget.
;   size     | width of meter, height is automatically calculated as size / 1.5.
;   caption  | the text to display on the meter face.
;
;   flags    | flags may be combined by using | (bitwise OR operator).
;            | #MTR_STYLE_VU, creates a VU style meter, default is linear style.
;            | #MTR_STYLE_LED, adds a peak indicator LED to any meter.
;            | the default needle is drawn without anti-aliased lines.
;            | using the following needle style flags will increase CPU usage.
;            | #MTR_NEEDLE_VAR1, draw needle with a single anti-aliased thick line.
;            | #MTR_NEEDLE_VAR2, draw outlined needle with anti-aliased lines.
;            | #MTR_NEEDLE_VAR3, draw filled needle with multiple anti-aliased calls.
;
; use SetMeterState(#gadget, position) to set needle position.
; position range is from 0 to 100.  Values outside this range are clipped.
;
; GetMeterState(#gadget) returns the needle position.
;
; SetMeterSmoothing(#gadget, value) applies a smooting function to the needle movement.
;        valid smoothing values are 0, 2, 4, 8, 16, 32, 64, 128.
;
; if you want to change the default meter options use these procedures.
; the procedures should be called before the meter is created.
;
; setMeterGradientColor(C1, C2, C3, C4) | omit all parameters to reset default colors.
; SetMeterCaptionFont(fontNumber)       | omit parameter to return to default font.
; SetMeterScaleFont(fontNumber)         | omit parameter to return to default font.
; SetMeterCaptionColor(color)           | omit parameter to return to default color.
; SetMeterScaleColor(color)             | omit parameter to return to default color.
; SetMeterNeedleColor(color)            | omit parameter to return to default color.
; SetMeterBottomColor(color)            | omit parameter to return to default color.

EnableExplicit

Structure MeterType
   width.i        ; meter width
   height.i       ; meter height
   flags.i        ; option flags, #MTR_STYLE_vu | #MTR_STYLE_LED
   position.f     ; needle position, returned with GetMeterState(GadNum)
   captionFont.i  ; use this font for meter caption
   captionColor.i ; caption text color
   scaleFont.i    ; use this font for scale labels
   scaleColor.i   ; color used for drawing scale and scale labels
   caption.s      ; meter caption
   gradColor_1.i  ; first color for gradient
   gradColor_2.i  ; second color for gradient
   gradColor_3.i  ; third color for gradient
   gradColor_4.i  ; forth color for gradient
   needleColor.i  ; color used to draw needle
   bottomColor.i  ; color of bottom region of meter face
   clip.i         ; indicates input exceeded maximum value (100)
   LED_radius.i   ; radius of LED
   LED_X.i        ; x location of peak LED indicator
   LED_Y.i        ; y location of peak LED indicator
   smoothing.i    ; smoothing value ( power of 2 up to 128 )
   buffer.f[128]  ; smoothing buffer
   bufferIdx.a    ; smoothing buffer index
   bufferSum.f    ; running sum of smoothing buffer
   mid_X.i        ; middle of meter (x axis)
   arcRadius.i    ; sets position of scale arc
   backImage.i    ; meter background image
   bottomImage.i  ; decorative bar at bottom of meter
EndStructure

Structure DefaultType
   gradientC_1.i
   gradientC_2.i
   gradientC_3.i
   gradientC_4.i
   captionFont.i
   captionColor.i
   scaleFont.i
   scaleColor.i
   needleColor.i
   bottomColor.i
EndStructure

;#MTR_STYLE_STD   = %0000
#MTR_STYLE_VU    = %0001
#MTR_STYLE_LED   = %0010
#MTR_NEEDLE_STD  = %0000
#MTR_NEEDLE_VAR1 = %0100
#MTR_NEEDLE_VAR2 = %1000
#MTR_NEEDLE_VAR3 = %1100

Define MtrDefaults.DefaultType
   MtrDefaults\gradientC_1  = $60FFFF ;$00FFFF
   MtrDefaults\gradientC_2  = $80DFDF ;$00FF00
   MtrDefaults\gradientC_3  = $A0BFBF ;$00FF80
   MtrDefaults\gradientC_4  = $FFAFAF ;$0000FF
   MtrDefaults\captionColor = 0
   MtrDefaults\captionFont  = LoadFont(#PB_Any,"Arial", 10, #PB_Font_Bold)
   MtrDefaults\scaleFont    = LoadFont(#PB_Any,"Arial", 8)
   MtrDefaults\scaleColor   = $FF0000
   MtrDefaults\needleColor  = $0000FF
   MtrDefaults\bottomColor  = $603030

Define mtr_default_caption_font = MtrDefaults\captionFont
Define mtr_default_Scale_font   = MtrDefaults\scaleFont

Dim Meter.MeterType(1)

NewMap MeterIndex.i() ; a Map to index Meter() with gadget number

Declare Draw_Meter(meterNumber)
Declare SetMeterState(meterNumber.i, position.f)
Declare g2D_AA_BlendColor(Color1.i, Color2.i, Blend.d)
Declare g2D_LineXY(x.i, y.i, x3.i, y3.i, Color.i=0, Thickness.i=1)

Procedure MeterGadget(gadNum.i, x.i, y.i, size.i, caption.s = "", flags.i = 0)

   Shared Meter() ; structured array
   Shared MeterIndex() ; Map
   Shared MtrDefaults ; structure
   Static meterCount = 1
   Protected result.i, w.i, h.i

   If flags < 0 Or flags > %1111 : ProcedureReturn 0 : EndIf
   If size < 150 : size = 150 : EndIf
   w = size : h = w / 1.5

   result = CanvasGadget(gadNum, x, y, w, h, #PB_Canvas_Border)
   If result <> 0
      If gadNum = #PB_Any : gadNum = result : EndIf
      If meterCount > 1 : ReDim Meter(meterCount) : EndIf

      With Meter(meterCount)
         \width        = w - 4 ; adjusted for 4 pixel border of canvas gadget
         \height       = h - 4 ; adjusted for 4 pixel border of canvas gadget
         \flags        = flags
         \gradColor_1  = MtrDefaults\gradientC_1
         \gradColor_2  = MtrDefaults\gradientC_2
         \gradColor_3  = MtrDefaults\gradientC_3
         \gradColor_4  = MtrDefaults\gradientC_4
         \captionColor = MtrDefaults\captionColor
         \captionFont  = MtrDefaults\captionFont
         \scaleFont    = MtrDefaults\scaleFont
         \scaleColor   = MtrDefaults\scaleColor
         \needleColor  = MtrDefaults\needleColor
         \bottomColor  = MtrDefaults\bottomColor
         \smoothing    = 0
         \bufferIdx    = 0
         \bufferSum    = 0
         \LED_radius   = \width / 40
         \LED_X        = \width - 13 - 3*\LED_radius
         \LED_Y        = \height - \height * 0.35 - 2*\LED_radius
         \caption      = caption
         \mid_X        = \width / 2
         \arcRadius    = h * (w / (w + 50.0)) ; this locates the scale arc
         \backImage    = CreateImage(#PB_Any, \width, \height, 32)
         \bottomImage  = CreateImage(#PB_Any, \width, \height * 0.2, 32)

         MeterIndex(Str(gadNum)) = meterCount

         Draw_Meter(meterCount)

         StartDrawing(CanvasOutput(gadNum))
            DrawImage(ImageID(\backImage),0 ,0)
         StopDrawing()

      EndWith

      SetMeterState(gadNum, 0)

      MeterCount + 1
   EndIf

   ProcedureReturn result
EndProcedure

Procedure Draw_Meter(meterNumber)
   Shared Meter()
   Protected x.i, y.i, px.i, py.i, angle.f, inc.f
   Protected vu.i, sf.f, color.i

   With Meter(meterNumber)

      StartDrawing(ImageOutput(\bottomImage))
         DrawingMode(#PB_2DDrawing_AlphaChannel)
         Box(0, 0, OutputWidth(), OutputHeight(), $00000000)
         DrawingMode(#PB_2DDrawing_AlphaBlend)
         RoundBox(0, 0, \width, \height * 0.3, \width / 20, \width / 20, $B0000000 + \bottomColor)
      StopDrawing()

      StartDrawing(ImageOutput(\backImage))
         DrawingMode(#PB_2DDrawing_Gradient)
         BackColor(\gradColor_4)
         GradientColor(0.33, \gradColor_3)
         GradientColor(0.66, \gradColor_2)
         FrontColor(\gradColor_1)
         LinearGradient(0, \height, 0, 0)
         Box(0, 0 ,\width, \height)
         DrawingMode(#PB_2DDrawing_Transparent)
         DrawingFont(FontID(\scaleFont))

         Circle(\mid_X, \height, \width * 0.1, 0)
         Circle(\mid_X, \height - 10, 4, \needleColor ! 1)

         inc = 1000 / \width
         angle = -45.0 - inc
         Repeat ; draw scale arc
            angle + inc
            If angle > 45.0 : angle = 45.0 : EndIf
            x = \mid_X  + Sin(Radian(angle)) * \arcRadius
            y = \height - Cos(Radian(angle)) * \arcRadius
            If angle <> -45.0
               LineXY(px,py,x,y,\scaleColor)
            EndIf
            px = x : py = y
         Until angle = 45

         If \flags & #MTR_STYLE_VU
            sf = 100 / Pow(10, 3/20)
            vu = 3
            Repeat
               angle = 0.9 * sf * Pow(10, vu/20) - 45
               px = \mid_X  + Sin(Radian(angle)) * (\arcRadius - 5)
               py = \height - Cos(Radian(angle)) * (\arcRadius - 5)
               x  = \mid_X  + Sin(Radian(angle)) * (\arcRadius + 5)
               y  = \height - Cos(Radian(angle)) * (\arcRadius + 5)
               LineXY(px, py, x, y, \scaleColor)

               Select vu
                  Case -20, -10, -5, -3, -2, -1, 0, 1, 2, 3
                     If vu < 0 : color = 0 : Else : color = $0000FF : EndIf
                     x  = \mid_X  + Sin(Radian(angle-1)) * (\arcRadius + 22)
                     y  = \height - Cos(Radian(angle-1)) * (\arcRadius + 22)
                     DrawRotatedText(x, y, Str(Abs(vu)), -angle, color)
               EndSelect

               Select vu
                  Case -2 To 3 : vu - 1
                  Case -3 : vu - 2
                  Case -5 : vu - 5
                  Case -30 To -10 : vu - 10
               EndSelect

            Until vu < -30

            DrawingFont(FontID(\captionFont))
            DrawText(10, \height * 0.4, "_", 0)
            DrawText(\width - 15, \height * 0.4 + 5, "+", $0000FF)

         Else ; linear style
            angle = -45.0 : inc = 9
            Repeat ; draw scale tic marks
               px = \mid_X  + Sin(Radian(angle)) * (\arcRadius - 5)
               py = \height - Cos(Radian(angle)) * (\arcRadius - 5)
               x  = \mid_X  + Sin(Radian(angle)) * (\arcRadius + 5)
               y  = \height - Cos(Radian(angle)) * (\arcRadius + 5)
               LineXY(px, py, x, y, \scaleColor)

               DrawingFont(FontID(\scaleFont))
               x  = \mid_X  + Sin(Radian(angle-1)) * (\arcRadius + 20)
               y  = \height - Cos(Radian(angle-1)) * (\arcRadius + 20)
               DrawRotatedText(x, y, Str(angle/9 + 5), -angle, \captionColor)

               angle + inc
            Until angle > 45
         EndIf

         If \flags & #MTR_STYLE_LED
            Circle(\LED_X, \LED_Y, \LED_radius + 2, 0)
            Circle(\LED_X, \LED_Y, \LED_radius , $404080)
            DrawingFont(FontID(\scaleFont))
            DrawText(\width - 27 - 3*\LED_radius, \height - \height * 0.35, "PEAK", \captionColor)
         EndIf

         If \caption
            DrawingFont(FontID(\captionFont))
            FrontColor(\captionColor)
            x = (\Width  - TextWidth(\caption)) / 2
            y = (\Height - TextHeight(\caption))/ 2
            DrawText(x, y, \caption)
         EndIf
      StopDrawing()
   EndWith

EndProcedure

Procedure SetMeterState(GadNum.i, position.f)
   ; call this procedure to adjust the needle position.
   ; range of position is from 0 to 100.
   ; values outside this range are clipped.

   Shared Meter(), MeterIndex()
   Protected meterNumber.i = MeterIndex(Str(GadNum))
   Protected mask.a, nw.i, x.i, y.i

   If meterNumber = 0
      ProcedureReturn 0 ; Meter number is not valid
   EndIf

   If position < 0 : position = 0 : EndIf

   With Meter(meterNumber)
      If position >= 100 : \clip = 8 : position = 100 : EndIf
      \position = position

      If \smoothing
         mask = \smoothing - 1
         \bufferSum - \buffer[\bufferIdx & mask]
         \buffer[\bufferIdx & mask] = position
         \bufferSum + position
         \bufferIdx + 1
         position = \bufferSum / \smoothing ; this is the running average
      EndIf

      position = Radian(0.9 * position - 45)
      x = \mid_X  + Sin(position) * (\arcRadius)
      y = \height - Cos(position) * (\arcRadius)

      StartDrawing(CanvasOutput(GadNum))

         ; first draw the meter background
         DrawImage(ImageID(\backImage),0 ,0)

         ; draw the needle
         Select \flags & %1100
            Case #MTR_NEEDLE_STD
               nw.i = 2 + Round(1.35 - Cos(position), #PB_Round_Nearest)
               Circle(x, y, 2, \needleColor)
               LineXY(\mid_X - 4, \height - 10, x-nw, y, \needleColor)
               LineXY(\mid_X + 4, \height - 10, x+nw, y, \needleColor)
               LineXY(\mid_X - 4, \height - 10, \mid_X + 4, \height - 10, \needleColor)
               FillArea(\mid_X, \height - 11, \needleColor, \needleColor ! 1)
            Case #MTR_NEEDLE_VAR1 ; draw needle with a single anti-aliased thick line.
               Circle(x, y, 2, \needleColor)
               g2d_LineXY(\mid_X, \height - 10, x, y, \needleColor, 5)
            Case #MTR_NEEDLE_VAR2 ; draw outlined needle with anti-aliased lines.
               nw.i = 2 + Round(1.35 - Cos(position), #PB_Round_Nearest)
               Circle(x, y, 2, \needleColor)
               g2d_LineXY(\mid_X - 4, \height - 10, x-nw, y, \needleColor)
               g2d_LineXY(\mid_X + 4, \height - 10, x+nw, y, \needleColor)
            Case #MTR_NEEDLE_VAR3 ; draw filled needle with multiple anti-aliased calls.
               nw.i = 2 + Round(1.35 - Cos(position), #PB_Round_Nearest)
               Circle(x, y, 2, \needleColor)
               LineXY(\mid_X - 4, \height - 10, x-nw, y, \needleColor)
               LineXY(\mid_X + 4, \height - 10, x+nw, y, \needleColor)
               LineXY(\mid_X - 4, \height - 10, \mid_X + 4, \height - 10, \needleColor)
               ; Call FillArea() before color edges are blurred with g2d_LineXY()
               FillArea(\mid_X, \height - 11, \needleColor, \needleColor ! 1)
               g2d_LineXY(\mid_X - 4, \height - 10, x-nw, y, \needleColor)
               g2d_LineXY(\mid_X + 4, \height - 10, x+nw, y, \needleColor)
         EndSelect

         If \flags & #MTR_STYLE_LED
            If \clip : \clip - 1
               Circle(\LED_X, \LED_Y, \LED_radius, $0000FF)
            EndIf
         EndIf

         ; draw the bottom region using an alpha blended image
         DrawAlphaImage(ImageID(\bottomImage),0, \height - ImageHeight(\bottomImage))

      StopDrawing()
   EndWith

EndProcedure

Procedure GetMeterState(GadNum.i)
   Shared Meter(), MeterIndex()
   Protected meterNumber = MeterIndex(Str(GadNum))

   If meterNumber = 0
      ProcedureReturn 0 ; Meter number is not valid
   EndIf

   ProcedureReturn Meter(meterNumber)\position
EndProcedure

Procedure SetMeterSmoothing(GadNum.i, value.i)
   ; valid smoothing values are 0, 2, 4, 8, 16, 32, 64, 128
   ; other values will be range limited and converted to a power of 2

   Shared Meter(), MeterIndex()
   Protected n.i, meterNumber = MeterIndex(Str(GadNum))

   If meterNumber = 0
      ProcedureReturn 0 ; Meter number is not valid
   EndIf

   If value > 128 : value = 128
   ElseIf value < 2 : value = 0
   Else : value = Pow(2, Round(Log(value) / Log(2),#PB_Round_Nearest))
   EndIf

   With Meter(meterNumber)

      For n = 0 To value - 1
         \buffer[n] = \position
      Next n

      \bufferIdx = 0
      \bufferSum = \position * value
      \smoothing = value
   EndWith

EndProcedure

Procedure SetMeterCaptionFont(font.i = -1)
   Shared MtrDefaults, mtr_default_caption_font
   If font = -1
      font = mtr_default_caption_font
   EndIf

   If IsFont(font)
      MtrDefaults\captionFont = font
   EndIf
EndProcedure

Procedure SetMeterCaptionColor(color.i = 0)
   Shared MtrDefaults
   MtrDefaults\captionColor = color
EndProcedure

Procedure SetMeterScaleFont(font.i = -1)
   Shared MtrDefaults, mtr_default_Scale_font
   If font = -1
      font = mtr_default_Scale_font
   EndIf

   If IsFont(font)
      MtrDefaults\scaleFont = font
   EndIf
EndProcedure

Procedure SetMeterScaleColor(color.i = $FF0000)
   Shared MtrDefaults
   MtrDefaults\scaleColor = color
EndProcedure

Procedure SetMeterNeedleColor(color.i = $0000FF)
   Shared MtrDefaults
   MtrDefaults\needleColor = color
EndProcedure

Procedure SetMeterBottomColor(color.i = $603030)
   Shared MtrDefaults
   MtrDefaults\bottomColor = color
EndProcedure

Procedure SetMeterGradientColor(top.i = $60FFFF, mid1.i = $80DFDF, mid2.i = $A0BFBF, bottom.i = $FFAFAF)
   Shared MtrDefaults
   MtrDefaults\gradientC_1 = top
   MtrDefaults\gradientC_2 = mid1
   MtrDefaults\gradientC_3 = mid2
   MtrDefaults\gradientC_4 = bottom
EndProcedure

Procedure.i g2D_AA_BlendColor(Color1.i, Color2.i, Blend.d)
  ; RASHAD, smooths color edges to produce near anti-aliasing
  Protected Red, Green, Blue, Red2, Green2, Blue2
  Red = Color1 & $FF
  Green = Color1 >> 8 & $FF
  Blue = Color1 >> 16
  Red2 = Color2 & $FF
  Green2 = Color2 >> 8 & $FF
  Blue2 = Color2 >> 16
  Red = Red * Blend + Red2 * (1-Blend)
  Green = Green * Blend + Green2 * (1-Blend)
  Blue = Blue * Blend + Blue2 * (1-Blend)
  ProcedureReturn (Red | Green << 8 | Blue << 16)
EndProcedure

Procedure g2D_LineXY(x.i, y.i, x3.i, y3.i, Color.i=0, Thickness.i=1)
  ; RAHSAD, Le Soldat Inconnu and others
  Protected.i Wd = x3 - X
  Protected.i Ht = y3 - Y
  Protected.i SignX, SignY, n, nn, Color_Found
  Protected.d Thick, x2, y2, Application, Hypo, CosPhi, SinPhi
  If Wd >= 0
    SignX = 1
  Else
    SignX = -1
    Wd = - Wd
  EndIf
  If Ht >= 0
    SignY = 1
  Else
    SignY = -1
    Ht = -Ht
  EndIf
  Thick = Thickness / 2
  Hypo = Sqr(Wd * Wd + Ht * Ht)
  CosPhi = Wd / Hypo
  SinPhi = -Sin(ACos(CosPhi))
  For n = -Thickness To Wd + Thickness
    For nn = -Thickness To Ht + Thickness
      x2 = n * CosPhi - nn * SinPhi
      y2 = Abs(n * SinPhi + nn * CosPhi)
      If y2 <= (Thick + 0.5)
        Application =  0.5 + Thick - y2
        If Application > 1
          Application = 1
        EndIf
        If (x2 > -1) And (x2 < (Hypo + 1))
          If x2 < 0
            Application * (1 + x2)
          ElseIf x2 > Hypo
            Application * (1 - x2 + Hypo)
          EndIf
        Else
          Application = 0
        EndIf
        If Application > 0
          If Application < 1
            Color_Found = Point(X + n * SignX, Y + nn * SignY)
            Plot(X + n * SignX, Y + nn * SignY, g2D_AA_BlendColor(Color, Color_Found, Application))
          Else
            Plot(X + n * SignX, Y + nn * SignY, Color)
          EndIf
        EndIf
      EndIf
    Next nn
  Next n
EndProcedure

DisableExplicit
Code: Select all
; MeterGadgetTest.pb
; by BasicallyPure
; 3.28.2013

IncludeFile"MeterGadget.pbi"

EnableExplicit

Declare FAKE_SIGNAL()

Define flags = #PB_Window_ScreenCentered | #PB_Window_MinimizeGadget | #PB_Window_SystemMenu
OpenWindow(0, 0, 0, 800, 600, "Meter Gadger Test", flags)
SetWindowColor(0,$300000)

AddWindowTimer(0,0,100)

flags = #MTR_STYLE_VU | #MTR_STYLE_LED
Define mtr_VU_L    = MeterGadget(#PB_Any, 020, 050, 250, "VU - Left" , flags)
Define mtr_VU_R    = MeterGadget(#PB_Any, 285, 050, 250, "VU - Right", flags)

SetMeterNeedleColor($802020)
SetMeterBottomColor($A0A0A0)
Define mtr_RPM.i   = MeterGadget(#PB_Any, 560, 050, 200, "RPM x 1000")

SetMeterGradientColor($B09090, $7090B0, $B09090, $204020)
SetMeterCaptionColor($404000)
SetMeterNeedleColor($E06060)
SetMeterBottomColor()
Define mtr_Volts.i = MeterGadget(#PB_Any, 020, 330, 150, "Volts")
Define mtr_Amps.i  = MeterGadget(#PB_Any, 180, 330, 150, "Amps")

setMeterNeedleColor($A0D0A0)
setMeterScaleColor($80FF00)
setMeterBottomColor($205020)
setMeterCaptionColor($FFFFFF)
setMeterGradientColor($40A040, $509050, $40A040, $205050)
Define mtr_Watts.i = MeterGadget(#PB_Any, 340, 330, 150, "Watts x 10")

Global track_1 = TrackBarGadget(#PB_Any, 020, 450, 470, 30, 0, 100)
Global track_2 = TrackBarGadget(#PB_Any, 560, 195, 200, 30, 0, 100)
SetGadgetState(track_2, 15) : SetMeterState(mtr_RPM, 15)
Global track_3 = TrackBarGadget(#PB_Any, 20, 230, 200, 30, 1, 7, #PB_TrackBar_Ticks)
SetGadgetState(track_3, 4)
Global chkBox_Smoothing = CheckBoxGadget(#PB_Any,20, 270, 200, 20, " Smoothing = 16")

Define amp_L.f = 50
Define amp_R.f = 50
Define smoothing.a = 0

Repeat
   Select WaitWindowEvent()
      Case #PB_Event_CloseWindow
         Break
      Case #PB_Event_Gadget
         Select EventGadget()
            Case track_1
               SetMeterState(mtr_Volts, GetGadgetState(track_1))
               SetMeterState(mtr_Amps , GetGadgetState(track_1))
               SetMeterState(mtr_Watts, (getMeterState(mtr_Volts)/10) * getMeterState(mtr_Amps)/10)
            Case track_2
               SetMeterState(mtr_RPM, GetGadgetState(track_2))
            Case track_3
               smoothing = Pow(2, GetGadgetState(track_3))
               SetGadgetText(chkBox_Smoothing, " Smoothing = " + Str(smoothing))
               If GetGadgetState(chkBox_Smoothing)
                  setMeterSmoothing(mtr_VU_L, smoothing)
               EndIf
            Case chkBox_Smoothing
               If GetGadgetState(chkBox_Smoothing)
                  smoothing = Pow(2, GetGadgetState(track_3))
                  setMeterSmoothing(mtr_VU_L, smoothing)
               Else
                  setMeterSmoothing(mtr_VU_L, 0)
               EndIf
         EndSelect
      Case #PB_Event_Timer
         If EventTimer() = 0
            FAKE_SIGNAL()
            SetMeterState(mtr_VU_L, amp_L)
            SetMeterState(mtr_VU_R, amp_R)
         EndIf
   EndSelect
ForEver

End

Procedure FAKE_SIGNAL()
   Shared amp_L, amp_R
   Static bias.i = 7

   amp_L + Random(16) - bias
   amp_R = amp_L + Random(16) - 8

   If amp_L < 0
      amp_L = 0 : bias = 7
   ElseIf amp_L > 100
      amp_L = 100 : bias = 9
   EndIf

   If amp_R < 0
      amp_R = 0
   ElseIf amp_R > 100
      amp_R = 100
   EndIf

EndProcedure


