[RetroPixel] Tutorials 1 - 5
Posted: Sun Nov 06, 2022 4:04 pm
RetroPixel GFX Library: viewtopic.php?p=590989#p590989
Tutorial 1 - First steps:
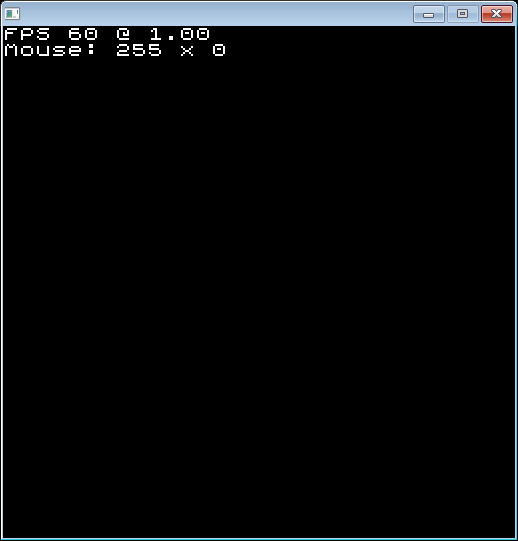
 Tutorial 2 - Input & Screen Modes:
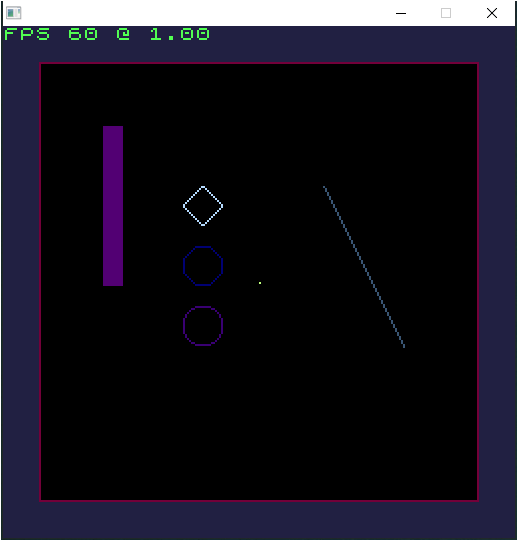
 Tutorial 3 - Drawing Basics:
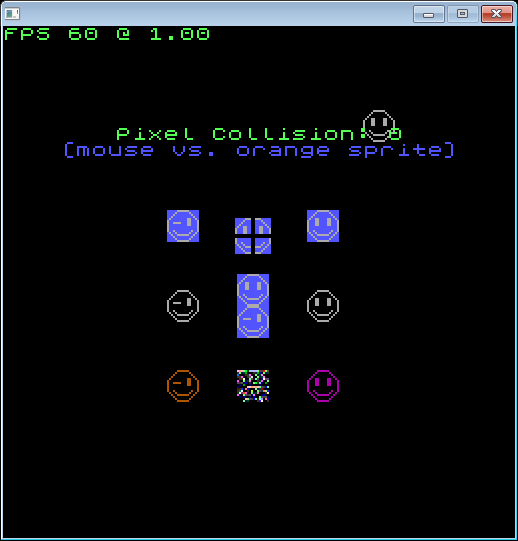
Tutorial 4 - Draw "Sprites" from memory:
 Tutorial 5 - Backbuffer manipulation & Timer functions:
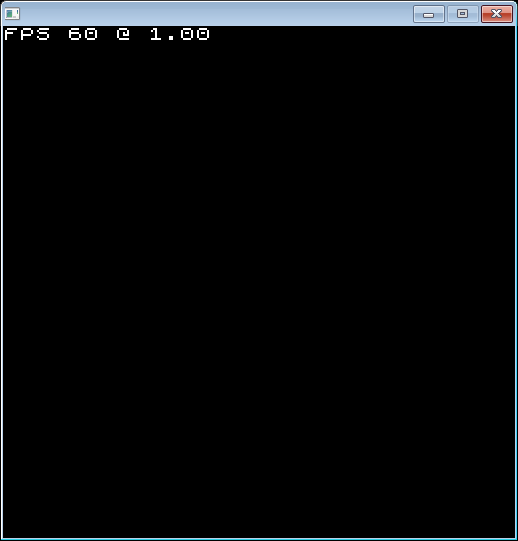
Tutorial 1 - First steps:
Code: Select all
EnableExplicit

XIncludeFile "rpix.pbi"

;=====================================================================================

;TUTORIAL 1 - First steps :)

;=====================================================================================

;-------------------------------------------------------------------------------------
;>>> rpixVersion.i():
;-------------------------------------------------------------------------------------
;- returns the version number to make sure the library is compitable (compare to #RPIX_VERSION)
;-------------------------------------------------------------------------------------

;-------------------------------------------------------------------------------------
;>>> rpixInterface.i(WindowHandle,Width.i,Height.i,Aspect.i,FrameRate.i) = returns a pointer to the interface or null
;-------------------------------------------------------------------------------------
;- creates the the interface to get access to all functions of the gfx library
;- the window handle is the operating system windown handle (in purebasic this would be WindowID())
;- Width & Height describes the screen resolution which is independent to the host window/control size
;- the screen will be scaled to the host window/control size
;- if Aspect is true the screen will retain its aspect ratio during scaling
;- the FrameRate determines how often the backbuffer gets drawn to the screen (per second) typical values are 30 or 60
;-------------------------------------------------------------------------------------

;=====================================================================================

;Interface RPIX

;the first 4 important functions :)
;without them we wont see anything

;-------------------------------------------------------------------------------------
;>>> \BufferFill.i(Index.i = 0) = return is meaningles
;-------------------------------------------------------------------------------------
;- fills the backbuffer or in other/clears the screen
;- the index can be 0 - 255 and describes the color index of the color used to clear the screen
;-------------------------------------------------------------------------------------

;-------------------------------------------------------------------------------------
;>>> \DrawText.i(Surface.i,X.i,Y.i,Text.s,IndexTint.i,CenterH.i = #False,CenterV.i = #False) = returns nothing
;-------------------------------------------------------------------------------------
;- fills the backbuffer or in other words it clears the screen
;- the index can be 0 - 255 and describes the color index of the color used to clear the screen
;-------------------------------------------------------------------------------------

;-------------------------------------------------------------------------------------
;>>> \BufferDraw.i(Surface.i,X.i,Y.i,Text.s,IndexTint.i,CenterH.i = #False,CenterV.i = #False) = returns  true/false
;-------------------------------------------------------------------------------------
;- draws text on the screen using the debug font with a size of 8 x 8
;- Surface where we want to draw if Surface is null we draw on the backbuffer
;- X & Y describe where the text should be drawn
;- IndexTint describes the color index into the palette 0 - 255 (what color we want)
;- CenterH if true will center text horizontally / CenterV vertically
;-------------------------------------------------------------------------------------

;-------------------------------------------------------------------------------------
;>>> \BufferDrawEvent.i(*Frames.Integer = #Null,*Time.Double = #Null) = returns true/false
;-------------------------------------------------------------------------------------
;- does the same as BufferDraw.i() but it actively waits for the frame to be over
;- it ensures that every frame takes the time specified with FrameRate in rpixInterface.i()
;- *Frames can be pointed to an integer it will return the current framerate
;- *Time can be pointed to a double it returns the deltatime (frametime target / frametime current)
;-------------------------------------------------------------------------------------

;-------------------------------------------------------------------------------------
;>>> \Release.i()
;-------------------------------------------------------------------------------------
;- cleans up everthing must be called before the host window/control gets closed!
;- cleans up palettes, surfaces, tiles, fonts, animations... everything
;-------------------------------------------------------------------------------------

;*******************************

Structure DUMMY_STRUCT
  *e.RPIX;<- rpix (main) interface
  *p.RPIX_PALETTE[16];<- rpix palette interface
  *s.RPIX_SURFACE[16];<- rpix surface interface
  *t.RPIX_TILE[16];<- rpix tile interface
  *a.RPIX_ANIMATION[16];<- rpix animation interface
EndStructure

Global dummy.DUMMY_STRUCT;<- a global struct to make things easier

Procedure.i Main()
  Protected exit.i
  Protected frames.i
  Protected delta.d
  With dummy
    If rpixVersion() = #RPIX_VERSION;<- test if the version is correct
      If OpenWindow(#Null,#Null,#Null,512,512,#Null$,#PB_Window_SystemMenu|#PB_Window_MinimizeGadget|#PB_Window_ScreenCentered)
        \e = rpixInterface(WindowID(0),256,256);<- create the interface (Aspect & FrameRate will use the preset values)
        If \e;<- always verify if it worked
          Repeat
            Repeat
              Select WindowEvent()
                Case #PB_Event_CloseWindow
                  exit = #True
                Case #Null
                  Break
              EndSelect
            ForEver
            \e\BufferFill();<- we fill/clear the backbuffer with the default value
            \e\DrawText(0,0,0,"FPS " + Str(frames) + " @ " + StrD(delta,2),255)
            ;\e\BufferDraw();<- we draw it on the screen - the screen will be black the default palette is the grayscale palette
            \e\BufferDrawEvent(@frames,@delta);<- does the same as above but waits (use this unless you want more control for custom timing)
          Until exit
          \e\Release();<- release everything (this function will clean up everything created with the devices: palettes, surfaces, tiles, fonts, animations...)
        EndIf
        CloseWindow(0)
      EndIf
    EndIf
  EndWith
EndProcedure

Main()

End
Code: Select all
EnableExplicit

XIncludeFile "rpix.pbi"

;=====================================================================================

;TUTORIAL 2 - Input & Screen Modes

;=====================================================================================

;Interface RPIX

;-------------------------------------------------------------------------------------
;>>> \InputUpdate.i(MouseHide.i = #False,MouseClip.i = #False,MouseRelative.i = #False) = returns true/false (is mouse and keyboard input) active!
;-------------------------------------------------------------------------------------
;- updates the input buffer (mouse & keyboard)
;- MouseHide if true will hide the mouse cursor if its inside the window/control area
;- MouseClip if true will trap the mouse within the window/control area
;- MouseRelative if true it will center the mouse and all movements will be relative
;- kinda crazy someting you probably only need for 3d stuff anyway its there...
;-------------------------------------------------------------------------------------

;-------------------------------------------------------------------------------------
;>>> \InputMouseActive.i() = returns true/false (if the mouse is insde and over the window/control area)
;>>> \InputMousePosition.i(*OutX.Integer,*OutY.Integer) = returns true/false (if the mouse is insde and over the window/control area)
;>>> \InputMouseTranslate.i(*OutX.Integer,*OutY.Integer) = returns true/false (if the mouse is insde and over the window/control area)
;>>> \InputMouseTest.i(MouseX.i,MouseY.i,X.i,Y.i,Width.i,Height.i,Center.i = #False) = returns true/false (mouse inside rect)
;>>> \InputMouseWheel.i(*Value.Integer) returns the wheel value (negative or positive) or null if no wheel input is available
;-------------------------------------------------------------------------------------
;- InputMousePosition returns the window/control mouse postion to the integers pointed to by *OutX & *OutY
;- InputMouseTranslate returns the screen mouse position to the integers pointed to by *OutX & *OutY
;- InputMouseTest is an easy way to test the mouse against a rect
;- InputMouseWheel does also report the wheel value to a integer pointed to by *Value (optional)
;-------------------------------------------------------------------------------------

;-------------------------------------------------------------------------------------
;>>> \InputKeyActive.i() = returns true/false (does the program have the input focus)
;>>> \InputKeyDown.i(Code.i) = returns true/false
;>>> \InputKeyUp.i(Code.i) = returns true/false
;>>> \InputKeyToggle.i(Code.i) = returns true/false
;>>> \InputKeyChar.i(*Char) = returns true/false
;>>> \InputKeyCode.i(*Code) = returns true/false
;>>> \InputKeyMapToChar.i(Code.i) = returns the char code of the key code
;>>> \InputKeyMapToCode.i(Char.s) = returns the key code of a char
;-------------------------------------------------------------------------------------
;- InputKeyDown check if a key is pressed (all keycodes expect #VK_ windows keycodes! - ex.: #VK_SPACE)
;- InputKeyUp check if the key is not pressed
;- InputKeyToggle was a key pressed once
;- InputKeyChar.i() returns the char of the last key pressed
;-------------------------------------------------------------------------------------

;-------------------------------------------------------------------------------------
;>>> \InputFlush.i()
;-------------------------------------------------------------------------------------
;- cleans the input buffers needed for InputMouseWheel and InputKeyChar
;-------------------------------------------------------------------------------------

;-------------------------------------------------------------------------------------
;>>> \ScreenToggle.i() = returns nothing (switches the hows window to fullscreen and back)
;>>> \ScreenMode.i() = returns true/false (is the window in fullscreen mode?)
;-------------------------------------------------------------------------------------
;- ScreenToggle only use if your render target is a window!
;-------------------------------------------------------------------------------------

Structure DUMMY_STRUCT
  *e.RPIX;<- rpix (main) interface
  *p.RPIX_PALETTE[16];<- rpix palette interface
  *s.RPIX_SURFACE[16];<- rpix surface interface
  *t.RPIX_TILE[16];<- rpix tile interface
  *a.RPIX_ANIMATION[16];<- rpix animation interface
  mx.i;<- mouse pos x
  my.i;<- mouse pos y
EndStructure

Global dummy.DUMMY_STRUCT;<- a global struct to make things easier

Procedure.i Main()
  Protected exit.i
  Protected frames.i
  Protected delta.d
  With dummy
    If rpixVersion() = #RPIX_VERSION
      If OpenWindow(#Null,#Null,#Null,512,512,#Null$,#PB_Window_SystemMenu|#PB_Window_MinimizeGadget|#PB_Window_ScreenCentered)
        \e = rpixInterface(WindowID(0),256,256,#True);<- lets keep the aspect ratio!
        If \e
          Repeat
            Repeat
              Select WindowEvent()
                Case #PB_Event_CloseWindow
                  exit = #True
                Case #Null
                  Break
              EndSelect
            ForEver

            \e\InputUpdate();<- update the input

            \e\InputMouseTranslate(@\mx,@\my);<- get the mouse position in screen space

            If \e\InputKeyToggle(#VK_F1);<- the key [f1] will now switch between screen & window mode
              \e\ScreenToggle()
            EndIf

            \e\BufferFill()

            \e\DrawText(0,0,0,"FPS " + Str(frames) + " @ " + StrD(delta,2),255)
            \e\DrawText(0,0,8,"Mouse: " + Str(\mx) +  " x " + Str(\my),255);<- display the mouse pos

            \e\BufferDrawEvent(@frames,@delta)
          Until exit Or \e\InputKeyToggle(#VK_ESCAPE);<-  the [escape] key will now end the program
          \e\Release()
        EndIf
        CloseWindow(0)
      EndIf
    EndIf
  EndWith
EndProcedure

Main()

End
Code: Select all
EnableExplicit

XIncludeFile "rpix.pbi"

;=====================================================================================

;TUTORIAL 3 - Drawing Basics

;=====================================================================================

;Interface RPIX

;the first palette functions to change the active palette so we can choose colors

;-------------------------------------------------------------------------------------
; PalettePreset.i(Palette.i,Preset.i) = returns nothing
; PaletteSet.i(Index.i,Color.i) = returns nothing
; PaletteGet.i(Index.i,*Color.Long) = returns nothing
;-------------------------------------------------------------------------------------
;- PalettePreset loads a Preset (#RPIX_PALETTE_) palette to the Palette (0 = active palette)
;- PaletteSet sets the color at Index (0 - 255) of the active palette
;- PaletteGet gets the color Index and writes it to a long pointed to by *Color
;-------------------------------------------------------------------------------------

;basic drawing functions we will get into drawing/blitting memory surfaces later ;)

;-------------------------------------------------------------------------------------
;>>> \BufferSet.i(X.i,Y.i,Index.i)
;>>> \BufferGet.i(X.i,Y.i,*Index.Ascii)
;>>> \DrawLine.i(Surface.i,X1.i,Y1.i,X2.i,Y2.i,Index.i)
;>>> \DrawBox.i(Surface.i,X.i,Y.i,Width.i,Height.i,Index.i,Filled.i = #False,Center.i = #False)
;>>> \DrawCircle.i(Surface.i,X.i,Y.i,Radius.i,Bend.i,Index.i)
;>>> \DrawFill.i(Surface.i,X.i,Y.i,IndexFill.i,IndexSkip.i = #Null,Skip.i = #False)
;-------------------------------------------------------------------------------------
;- BufferSet sets a pixel in the buffer (backbuffer) to the specified color Index
;- BufferGet gets the pixel index and writes it to the ascii pointed to by *color
;- DrawLine will draw a line from X1 x Y1 to X2 x Y2 with the color specified by Index
;- DrawBox draws a box described by X,Y,Width,Height it can be optionally Filled and Centered
;- DrawCircle draws a circle at X,Y with the specified radius and a specified segment size
;- DrawFill fills in an aerea with the specified color Index if Skip is set everything is filled in expect the color IndexSkip
;-------------------------------------------------------------------------------------

Structure DUMMY_STRUCT
  *e.RPIX;<- rpix (main) interface
  *p.RPIX_PALETTE[16];<- rpix palette interface
  *s.RPIX_SURFACE[16];<- rpix surface interface
  *t.RPIX_TILE[16];<- rpix tile interface
  *a.RPIX_ANIMATION[16];<- rpix animation interface
  mx.i;<- mouse pos x
  my.i;<- mouse pos y
EndStructure

Global dummy.DUMMY_STRUCT;<- a global struct to make things easier

Procedure.i Main()
  Protected exit.i
  Protected frames.i
  Protected delta.d
  Protected index.i
  Protected color.i
  With dummy
    If rpixVersion() = #RPIX_VERSION
      If OpenWindow(#Null,#Null,#Null,512,512,#Null$,#PB_Window_SystemMenu|#PB_Window_MinimizeGadget|#PB_Window_ScreenCentered)
        \e = rpixInterface(WindowID(0),256,256,#True)
        If \e


          ;press [f2] to cycle between different palettes
          ;the standart palette is grayscale
          index = 1
          \e\PalettePreset(0,#RPIX_PALETTE_VGA);<- load a different preset palette (0 = active palette)

          Repeat
            Repeat
              Select WindowEvent()
                Case #PB_Event_CloseWindow
                  exit = #True
                Case #Null
                  Break
              EndSelect
            ForEver
            \e\InputUpdate()
            \e\InputMouseTranslate(@\mx,@\my)
            If \e\InputKeyToggle(#VK_F1);<- the key [f1] will now switch between screen & window mode
              \e\ScreenToggle()
            EndIf
            If \e\InputKeyToggle(#VK_F2)
              index + 1
              If index = 3
                index = 0
              EndIf
              Select index
                Case 0
                  \e\PalettePreset(0,#RPIX_PALETTE_GRAYSCALE)
                Case 1
                  \e\PalettePreset(0,#RPIX_PALETTE_VGA)
                Case 2
                  For color = 0 To 255
                    Debug \e\PaletteSet(color,RGB(color >> 4,color >> 1,color >> 4));<- set the palette manually
                  Next
              EndSelect
            EndIf

            \e\BufferFill()

            \e\BufferSet(128,128,70);<- sets a pixel (backbuffer
            \e\DrawLine(0,160,80,200,160,150);<- draws a line (0 = backbuffer)
            \e\DrawCircle(0,100,90,10,40,102);<- draws a circle with different segment sizes
            \e\DrawCircle(0,100,120,10,4,104)
            \e\DrawCircle(0,100,150,10,0,106)
            \e\DrawBox(0,50,50,10,80,107,#True)
            \e\DrawBox(0,128,128,220,220,110,#False,#True);<- draws a rect which can be also filled and centered
            \e\DrawFill(0,\mx,\my,200);<- fills the area where the mouse is if skip is true the color set in Index is not filled in!

            \e\DrawText(0,0,0,"FPS " + Str(frames) + " @ " + StrD(delta,2),10)
            \e\BufferDrawEvent(@frames,@delta)
          Until exit Or \e\InputKeyToggle(#VK_ESCAPE)
          \e\Release()
        EndIf
        CloseWindow(0)
      EndIf
    EndIf
  EndWith
EndProcedure

Main()

End
Tutorial 4 - Draw "Sprites" from memory:
Code: Select all
EnableExplicit
XIncludeFile "rpix.pbi"
;=====================================================================================
;TUTORIAL 4 - Drawing "Sprites" from memory
;this tutorial shows how to directly draw indexed sprites/images from memory to the backbuffer!
;dont worry we will cover the easier dedicated sprite (in rpix surface), tile, animation, ... functions :D
;=====================================================================================
;Interface RPIX
;why so many functions that do almost the same?
;speed reasons the more per pixel tasks the underlying blitting routine has to facilitate
;the slower the drawing/rendering will be :)
;-------------------------------------------------------------------------------------
;>>> \Draw.i(*Memory,Width.i,Height.i,X.i,Y.i,Center.i = #False) = returns true/false (was anything drawn)
;>>> \DrawMask.i(*Memory,Width.i,Height.i,X.i,Y.i,IndexMask.i,Center.i = #False) = returns true/false (was anything drawn)
;>>> \DrawTint.i(*Memory,Width.i,Height.i,X.i,Y.i,IndexMask.i,IndexTint.i,Center.i = #False) = returns true/false (was anything drawn)
;>>> \DrawTest.i(*Memory,Width.i,Height.i,X.i,Y.i,IndexMask.i,IndexTest.i,Center.i = #False) = returns true/false (pixel collision)
;>>> \DrawRect.i(*Memory,Span.i,X.i,Y.i,SrcX.i,SrcY.i,SrcW.i,SrcH.i,Center.i = #False) = returns true/false (was anything drawn)
;>>> \DrawRectMask.i(*Memory,Span.i,X.i,Y.i,SrcX.i,SrcY.i,SrcW.i,SrcH.i,IndexMask.i,Center.i = #False) = returns true/false (was anything drawn)
;>>> \DrawRectTint.i(*Memory,Span.i,X.i,Y.i,SrcX.i,SrcY.i,SrcW.i,SrcH.i,IndexMask.i,IndexTint.i,Center.i = #False) = returns true/false (was anything drawn)
;>>> \DrawRectTest.i(*Memory,Span.i,X.i,Y.i,SrcX.i,SrcY.i,SrcW.i,SrcH.i,IndexMask.i,IndexTest.i,Center.i = #False) = returns true/false (pixel collision)
;>>> \DrawProc.i(*Proc,*Parameter,*Memory,Width.i,Height.i,X.i,Y.i,Center.i = #False)
;>>> \DrawProcRect.i(*Proc,*Parameter,*Memory,Span.i,X.i,Y.i,SrcX.i,SrcY.i,SrcW.i,SrcH.i,Center.i = #False)
;-------------------------------------------------------------------------------------
;Draw draws an indexed sprite/image from *Memory of the Width, Height to the position X, Y
;DrawMask does the same as DrawA but the color IndexMask will be ignored thus be fully transparent
;DrawTint does the same as DrawB but all pixels that are drawn are set to the color specified by ImageTint
;DrawTest does the same as DrawB but checks for overlapping pixels of the color specified by IndexTest
;DrawRect - DrawRecTest do the same as Draw - DrawTest expect that we can select what portion within the sprite to draw set by SrcX, SrcY, SrcW, SrcH
;Span is the Width of the sprite/image the height does not need to be specified
;DrawProc will transfers the actual drawing/blitting to a user defined function which will be called with the *Parameter set by the user and a pointer to the *Draw struct (see rpix.pbi)
;DrawProcRect same as above - these functions allow for custom draw/blitting routines :D
;-------------------------------------------------------------------------------------
Structure DUMMY_STRUCT
*e.RPIX;<- rpix (main) interface
*p.RPIX_PALETTE[16];<- rpix palette interface
*s.RPIX_SURFACE[16];<- rpix surface interface
*t.RPIX_TILE[16];<- rpix tile interface
*a.RPIX_ANIMATION[16];<- rpix animation interface
mx.i;<- mouse pos x
my.i;<- mouse pos y
EndStructure
Global dummy.DUMMY_STRUCT;<- a global struct to make things easier
Procedure.i Main()
Protected exit.i
Protected frames.i
Protected delta.d
Protected test.i
With dummy
If rpixVersion() = #RPIX_VERSION
If OpenWindow(#Null,#Null,#Null,512,512,#Null$,#PB_Window_SystemMenu|#PB_Window_MinimizeGadget|#PB_Window_ScreenCentered)
\e = rpixInterface(WindowID(0),256,256,#True)
If \e
\e\PalettePreset(0,#RPIX_PALETTE_VGA);<- lets use the vga palette
Repeat
Repeat
Select WindowEvent()
Case #PB_Event_CloseWindow
exit = #True
Case #Null
Break
EndSelect
ForEver
\e\InputUpdate()
\e\InputMouseTranslate(@\mx,@\my)
If \e\InputKeyToggle(#VK_F1)
\e\ScreenToggle()
EndIf
\e\BufferFill()
\e\Draw(?sprite1,16,16,160,100,1);<- will draw the sprite as it is
\e\Draw(?sprite2,16,16,90,100,1)
\e\DrawMask(?sprite1,16,16,160,140,9,1);<- will draw the sprite but ignore the IndexMask color
\e\DrawMask(?sprite2,16,16,90,140,9,1)
\e\DrawTint(?sprite1,16,16,160,180,9,5,1);<- will draw the sprite but ignore the IndexMask color all other colors will be the one specified in IndexTint
\e\DrawTint(?sprite2,16,16,90,180,9,6,1)
\e\Draw(?sprite1,16,32,125,140,1);<- we can also draw both sprites at once :>
\e\DrawRect(?sprite1,16,125 - 5,100,0,0,8,8,1);<- or only draw parts
\e\DrawRect(?sprite1,16,125 + 5,100,8,0,8,8,1)
\e\DrawRect(?sprite1,16,125 - 5,110,0,8,8,8,1)
\e\DrawRect(?sprite1,16,125 + 5,110,8,8,8,8,1)
;we could also visualize the memory of this function o_O (be careful not to access bad memory)
\e\Draw(@Main(),16,16,125,180,1)
;a sprite with a collision "mask"
test = \e\DrawTest(?sprite1,16,16,\mx,\my,9,6,1);<- same as DrawB but with a collision/test mask IndexTest if what is drawn overlaps with this color the function returns true
\e\DrawText(0,128,50,"Pixel Collision: " + Str(test),10,#True)
\e\DrawText(0,128,58,"(mouse vs. orange sprite)",9,#True)
\e\DrawText(0,0,0,"FPS " + Str(frames) + " @ " + StrD(delta,2),10)
\e\BufferDrawEvent(@frames,@delta)
Until exit Or \e\InputKeyToggle(#VK_ESCAPE)
\e\Release()
EndIf
CloseWindow(0)
EndIf
EndIf
EndWith
EndProcedure
Main()
End
DataSection
sprite1:;16 x 16
Data.a 9,9,9,9,9,7,7,7,7,7,7,9,9,9,9,9
Data.a 9,9,9,9,7,9,9,9,9,9,9,7,9,9,9,9
Data.a 9,9,9,7,9,9,9,9,9,9,9,9,7,9,9,9
Data.a 9,9,7,9,9,9,9,9,9,9,9,9,9,7,9,9
Data.a 9,7,9,9,7,7,9,9,9,9,7,7,9,9,7,9
Data.a 7,9,9,9,7,7,9,9,9,9,7,7,9,9,9,7
Data.a 7,9,9,9,7,7,9,9,9,9,7,7,9,9,9,7
Data.a 7,9,9,9,7,7,9,9,9,9,7,7,9,9,9,7
Data.a 7,9,9,9,9,9,9,9,9,9,9,9,9,9,9,7
Data.a 7,9,9,9,9,9,9,9,9,9,9,9,9,9,9,7
Data.a 7,9,9,7,9,9,9,9,9,9,9,9,7,9,9,7
Data.a 9,7,9,9,7,9,9,9,9,9,9,7,9,9,7,9
Data.a 9,9,7,9,9,7,7,7,7,7,7,9,9,7,9,9
Data.a 9,9,9,7,9,9,9,9,9,9,9,9,7,9,9,9
Data.a 9,9,9,9,7,9,9,9,9,9,9,7,9,9,9,9
Data.a 9,9,9,9,9,7,7,7,7,7,7,9,9,9,9,9
sprite2:;16 x 16
Data.a 9,9,9,9,9,7,7,7,7,7,7,9,9,9,9,9
Data.a 9,9,9,9,7,9,9,9,9,9,9,7,9,9,9,9
Data.a 9,9,9,7,9,9,9,9,9,9,9,9,7,9,9,9
Data.a 9,9,7,9,9,9,9,9,9,9,9,9,9,7,9,9
Data.a 9,7,9,9,9,9,9,9,9,9,7,7,9,9,7,9
Data.a 7,9,9,9,9,9,9,9,9,9,7,7,9,9,9,7
Data.a 7,9,9,7,7,7,7,9,9,9,7,7,9,9,9,7
Data.a 7,9,9,9,9,9,9,9,9,9,7,7,9,9,9,7
Data.a 7,9,9,9,9,9,9,9,9,9,9,9,9,9,9,7
Data.a 7,9,9,9,9,9,9,9,9,9,9,9,9,9,9,7
Data.a 7,9,9,7,9,9,9,9,9,9,9,9,7,9,9,7
Data.a 9,7,9,9,7,9,9,9,9,9,9,7,9,9,7,9
Data.a 9,9,7,9,9,7,7,7,7,7,7,9,9,7,9,9
Data.a 9,9,9,7,9,9,9,9,9,9,9,9,7,9,9,9
Data.a 9,9,9,9,7,9,9,9,9,9,9,7,9,9,9,9
Data.a 9,9,9,9,9,7,7,7,7,7,7,9,9,9,9,9
EndDataSection
[code-pb]
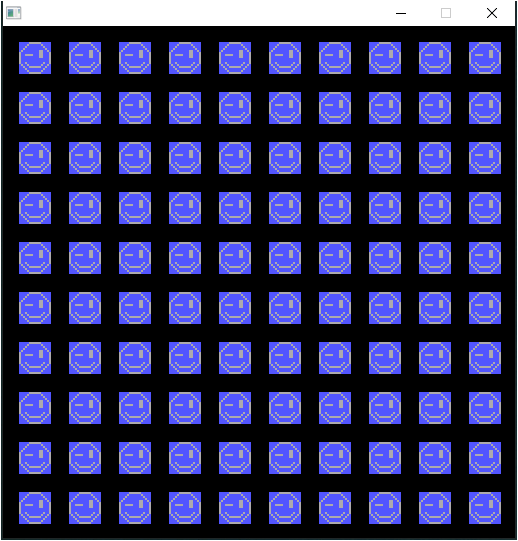
Tutorial 5 - Backbuffer manipulation & Timer functions:
[img]https://i.postimg.cc/qBzbQsFX/ifc-221106155014-5.png[/img]
[code-pb]
EnableExplicit
XIncludeFile "rpix.pbi"
;=====================================================================================
;TUTORIAL 5 - Backbuffer manipulation & Timer functions
;rpix has frametiming build in but you can use your own timings :)
;=====================================================================================
;Interface RPIX
;-------------------------------------------------------------------------------------
;>>> BufferReplace.i(IndexA.i,IndexB.i) = returns nothing
;>>> BufferSwap.i(IndexA.i,IndexB.i) = returns nothing
;>>> BufferChange.i(Mode.i,Value.i = #Null,Flag.i = #False) = returns nothing
;>>> BufferScroll.i(Amount.i,Vertical.i) = returns nothing
;-------------------------------------------------------------------------------------
;BufferReplace will replace color IndexA with color IndexB
;BufferSwap will swap the colors IndexA, IndexB
;BufferChange changes the output using the RPIX_CHANGE modes if flag is true the first to modes prevent a waparound
;BufferScroll scrolls the content of the buffer x amount of pixels
;-------------------------------------------------------------------------------------
;-------------------------------------------------------------------------------------
;>>> TimerEvent.i(FrameRate.i) = returns true/false
;>>> TimerWait.i(*Frames.Integer = #Null,*Time.Double = #Null) = returns nothing
;>>> TimerTick.i(*Tick.Double) = returns true/false
;>>> TimerDelay.i(Milliseconds.i) = returns nothing
;-------------------------------------------------------------------------------------
;TimerEvent changes the internal timer events which manage the framerate
;TimerWait waits for the frametime to elapse same as BufferDrawEvent but without rendering the backbuffer
;TimerTick returns a timestamp to the double pointed to by *Time (100 ns accuracy)
;TimerDelay waits x amount of milliseconds (1 ms accuracy)
;-------------------------------------------------------------------------------------
Structure DUMMY_STRUCT
*e.RPIX;<- rpix (main) interface
*p.RPIX_PALETTE[16];<- rpix palette interface
*s.RPIX_SURFACE[16];<- rpix surface interface
*t.RPIX_TILE[16];<- rpix tile interface
*a.RPIX_ANIMATION[16];<- rpix animation interface
mx.i;<- mouse pos x
my.i;<- mouse pos y
EndStructure
Global dummy.DUMMY_STRUCT;<- a global struct to make things easier
Procedure.i Main()
Protected exit.i
Protected test.i
Protected scroll.i
With dummy
If rpixVersion() = #RPIX_VERSION
If OpenWindow(#Null,#Null,#Null,512,512,#Null$,#PB_Window_SystemMenu|#PB_Window_MinimizeGadget|#PB_Window_ScreenCentered)
\e = rpixInterface(WindowID(0),256,256,#False,30);<- our screen only is 32 x 32 pixels
If \e
\e\TimerEvent(60);<- we ceated the screen with 30 fps but we decided that we want to run on 60 fps now! (affects BufferDrawEvent() and TimerWait())
\e\PalettePreset(0,#RPIX_PALETTE_VGA)
For test = 0 To 12
For scroll = 0 To 12
\e\Draw(?sprite1,16,16,16 + (25 * scroll),16 + (25 * test),1);<- draw the sprite on the backbuffer
Next
Next
test = 0
scroll = 0
Repeat
Repeat
Select WindowEvent()
Case #PB_Event_CloseWindow
exit = #True
Case #Null
Break
EndSelect
ForEver
\e\InputUpdate()
\e\InputMouseTranslate(@\mx,@\my)
If \e\InputKeyToggle(#VK_F1)
\e\ScreenToggle()
EndIf
;\e\BufferFill();<- we do not want to fill the backbuffer in this example so we are able to manipulate its content (this call would erase it)
If \e\InputKeyToggle(#VK_1);<- press key [1] to change the sprite background (replace blue with red and vice versa)
If test
\e\BufferReplace(4,9)
Else
\e\BufferReplace(9,4)
EndIf
test ! 1
EndIf
If \e\InputKeyToggle(#VK_2);<- press key [2] to switch the sprite background blue & gray or red & gray
If test
\e\BufferSwap(7,4)
Else
\e\BufferSwap(7,9)
EndIf
EndIf
If \e\InputKeyToggle(#VK_3);<- press key [3] to flip the background
\e\BufferFlip(#True)
EndIf
If \e\InputKeyToggle(#VK_4);<- press key [4] to scroll the background
scroll ! 1
EndIf
If scroll
\e\BufferScroll(1,#True)
\e\BufferScroll(1,#False);<- may look a bit strange since the pixels are so big!
EndIf
\e\BufferDraw();<- we now directly draw the bacbuffer to the screen
\e\TimerWait();<- and use the seperate wait function to do the timings
Until exit Or \e\InputKeyToggle(#VK_ESCAPE)
\e\Release()
EndIf
CloseWindow(0)
EndIf
EndIf
EndWith
EndProcedure
Main()
End
DataSection
sprite1:;16 x 16
Data.a 9,9,9,9,9,7,7,7,7,7,7,9,9,9,9,9
Data.a 9,9,9,9,7,9,9,9,9,9,9,7,9,9,9,9
Data.a 9,9,9,7,9,9,9,9,9,9,9,9,7,9,9,9
Data.a 9,9,7,9,9,9,9,9,9,9,9,9,9,7,9,9
Data.a 9,7,9,9,9,9,9,9,9,9,7,7,9,9,7,9
Data.a 7,9,9,9,9,9,9,9,9,9,7,7,9,9,9,7
Data.a 7,9,9,7,7,7,7,9,9,9,7,7,9,9,9,7
Data.a 7,9,9,9,9,9,9,9,9,9,7,7,9,9,9,7
Data.a 7,9,9,9,9,9,9,9,9,9,9,9,9,9,9,7
Data.a 7,9,9,9,9,9,9,9,9,9,9,9,9,9,9,7
Data.a 7,9,9,7,9,9,9,9,9,9,9,9,7,9,9,7
Data.a 9,7,9,9,7,9,9,9,9,9,9,7,9,9,7,9
Data.a 9,9,7,9,9,7,7,7,7,7,7,9,9,7,9,9
Data.a 9,9,9,7,9,9,9,9,9,9,9,9,7,9,9,9
Data.a 9,9,9,9,7,9,9,9,9,9,9,7,9,9,9,9
Data.a 9,9,9,9,9,7,7,7,7,7,7,9,9,9,9,9
EndDataSection
Code: Select all
EnableExplicit

XIncludeFile "rpix.pbi"

;=====================================================================================

;TUTORIAL 5 - Backbuffer manipulation & Timer functions

;rpix has frametiming build in but you can use your own timings :)

;=====================================================================================

;Interface RPIX

;-------------------------------------------------------------------------------------
;>>> BufferReplace.i(IndexA.i,IndexB.i) = returns nothing
;>>> BufferSwap.i(IndexA.i,IndexB.i) = returns nothing
;>>> BufferChange.i(Mode.i,Value.i = #Null,Flag.i = #False) = returns nothing
;>>> BufferScroll.i(Amount.i,Vertical.i) = returns nothing
;-------------------------------------------------------------------------------------
;BufferReplace will replace color IndexA with color IndexB
;BufferSwap will swap the colors IndexA, IndexB
;BufferChange changes the output using the RPIX_CHANGE modes if flag is true the first to modes prevent a waparound
;BufferScroll scrolls the content of the buffer x amount of pixels
;-------------------------------------------------------------------------------------

;-------------------------------------------------------------------------------------
;>>> TimerEvent.i(FrameRate.i) = returns true/false
;>>> TimerWait.i(*Frames.Integer = #Null,*Time.Double = #Null) = returns nothing
;>>> TimerTick.i(*Tick.Double) = returns true/false
;>>> TimerDelay.i(Milliseconds.i) = returns nothing
;-------------------------------------------------------------------------------------
;TimerEvent changes the internal timer events which manage the framerate
;TimerWait waits for the frametime to elapse same as BufferDrawEvent but without rendering the backbuffer
;TimerTick returns a timestamp to the double pointed to by *Time (100 ns accuracy)
;TimerDelay waits x amount of milliseconds (1 ms accuracy)
;-------------------------------------------------------------------------------------


Structure DUMMY_STRUCT
  *e.RPIX;<- rpix (main) interface
  *p.RPIX_PALETTE[16];<- rpix palette interface
  *s.RPIX_SURFACE[16];<- rpix surface interface
  *t.RPIX_TILE[16];<- rpix tile interface
  *a.RPIX_ANIMATION[16];<- rpix animation interface
  mx.i;<- mouse pos x
  my.i;<- mouse pos y
EndStructure

Global dummy.DUMMY_STRUCT;<- a global struct to make things easier

Procedure.i Main()
  Protected exit.i
  Protected test.i
  Protected scroll.i
  With dummy
    If rpixVersion() = #RPIX_VERSION
      If OpenWindow(#Null,#Null,#Null,512,512,#Null$,#PB_Window_SystemMenu|#PB_Window_MinimizeGadget|#PB_Window_ScreenCentered)
        \e = rpixInterface(WindowID(0),256,256,#False,30);<- our screen only is 32 x 32 pixels
        If \e

          \e\TimerEvent(60);<- we ceated the screen with 30 fps but we decided that we want to run on 60 fps now! (affects BufferDrawEvent() and TimerWait())

          \e\PalettePreset(0,#RPIX_PALETTE_VGA)

          For test = 0 To 12
            For scroll = 0 To 12
              \e\Draw(?sprite1,16,16,16 + (25 * scroll),16 + (25 * test),1);<- draw the sprite on the backbuffer
            Next
          Next

          test = 0
          scroll = 0

          Repeat
            Repeat
              Select WindowEvent()
                Case #PB_Event_CloseWindow
                  exit = #True
                Case #Null
                  Break
              EndSelect
            ForEver
            \e\InputUpdate()
            \e\InputMouseTranslate(@\mx,@\my)
            If \e\InputKeyToggle(#VK_F1)
              \e\ScreenToggle()
            EndIf

            ;\e\BufferFill();<- we do not want to fill the backbuffer in this example so we are able to manipulate its content (this call would erase it)

            If \e\InputKeyToggle(#VK_1);<- press key [1] to change the sprite background (replace blue with red and vice versa)
              If test
                \e\BufferReplace(4,9)
              Else
                \e\BufferReplace(9,4)
              EndIf
              test ! 1
            EndIf

            If \e\InputKeyToggle(#VK_2);<- press key [2] to switch the sprite background blue & gray or red & gray
              If test
                \e\BufferSwap(7,4)
              Else
                \e\BufferSwap(7,9)
              EndIf
            EndIf

            If \e\InputKeyToggle(#VK_3);<- press key [3] to flip the background
              \e\BufferFlip(#True)
            EndIf

            If \e\InputKeyToggle(#VK_4);<- press key [4] to scroll the background
              scroll ! 1
            EndIf

            If scroll
              \e\BufferScroll(1,#True)
              \e\BufferScroll(1,#False);<- may look a bit strange since the pixels are so big!
            EndIf


            \e\BufferDraw();<- we now directly draw the bacbuffer to the screen
            \e\TimerWait();<- and use the seperate wait function to do the timings
          Until exit Or \e\InputKeyToggle(#VK_ESCAPE)
          \e\Release()
        EndIf
        CloseWindow(0)
      EndIf
    EndIf
  EndWith
EndProcedure

Main()

End

DataSection
  sprite1:;16 x 16
  Data.a 9,9,9,9,9,7,7,7,7,7,7,9,9,9,9,9
  Data.a 9,9,9,9,7,9,9,9,9,9,9,7,9,9,9,9
  Data.a 9,9,9,7,9,9,9,9,9,9,9,9,7,9,9,9
  Data.a 9,9,7,9,9,9,9,9,9,9,9,9,9,7,9,9
  Data.a 9,7,9,9,9,9,9,9,9,9,7,7,9,9,7,9
  Data.a 7,9,9,9,9,9,9,9,9,9,7,7,9,9,9,7
  Data.a 7,9,9,7,7,7,7,9,9,9,7,7,9,9,9,7
  Data.a 7,9,9,9,9,9,9,9,9,9,7,7,9,9,9,7
  Data.a 7,9,9,9,9,9,9,9,9,9,9,9,9,9,9,7
  Data.a 7,9,9,9,9,9,9,9,9,9,9,9,9,9,9,7
  Data.a 7,9,9,7,9,9,9,9,9,9,9,9,7,9,9,7
  Data.a 9,7,9,9,7,9,9,9,9,9,9,7,9,9,7,9
  Data.a 9,9,7,9,9,7,7,7,7,7,7,9,9,7,9,9
  Data.a 9,9,9,7,9,9,9,9,9,9,9,9,7,9,9,9
  Data.a 9,9,9,9,7,9,9,9,9,9,9,7,9,9,9,9
  Data.a 9,9,9,9,9,7,7,7,7,7,7,9,9,9,9,9
EndDataSection